Modern creative workflows demand high-performance rendering capabilities that can scale on demand without the operational overhead of managing infrastructure. AWS Deadline Cloud service-managed fleets address this challenge. It handles the complexity of Amazon Elastic Compute Cloud (Amazon EC2) instance management, operating system updates, virtual private cloud (VPC) configuration, and networking. You can then focus on your rendering workloads rather than infrastructure operations.
When combined with the cloud-native file system of LucidLink, you gain a powerful solution that eliminates infrastructure management both in the cloud and on-premises. This integration provides creative teams a way to perform large-scale rendering operations with minimal infrastructure footprint, while maintaining instant access to project files from anywhere.
We will demonstrate how to configure AWS Deadline Cloud service-managed fleets with LucidLink integration, providing you with a solution for scalable, high-performance rendering workflows.
AWS Deadline Cloud now supports service-managed fleet configuration scripts, making it quicker than ever to integrate third-party storage solutions, such as LucidLink, into your rendering workflows. We will walk you through setting up a complete Deadline Cloud environment with LucidLink for high-performance, scale-out, cloud-based rendering.
Before you begin, make certain you have:
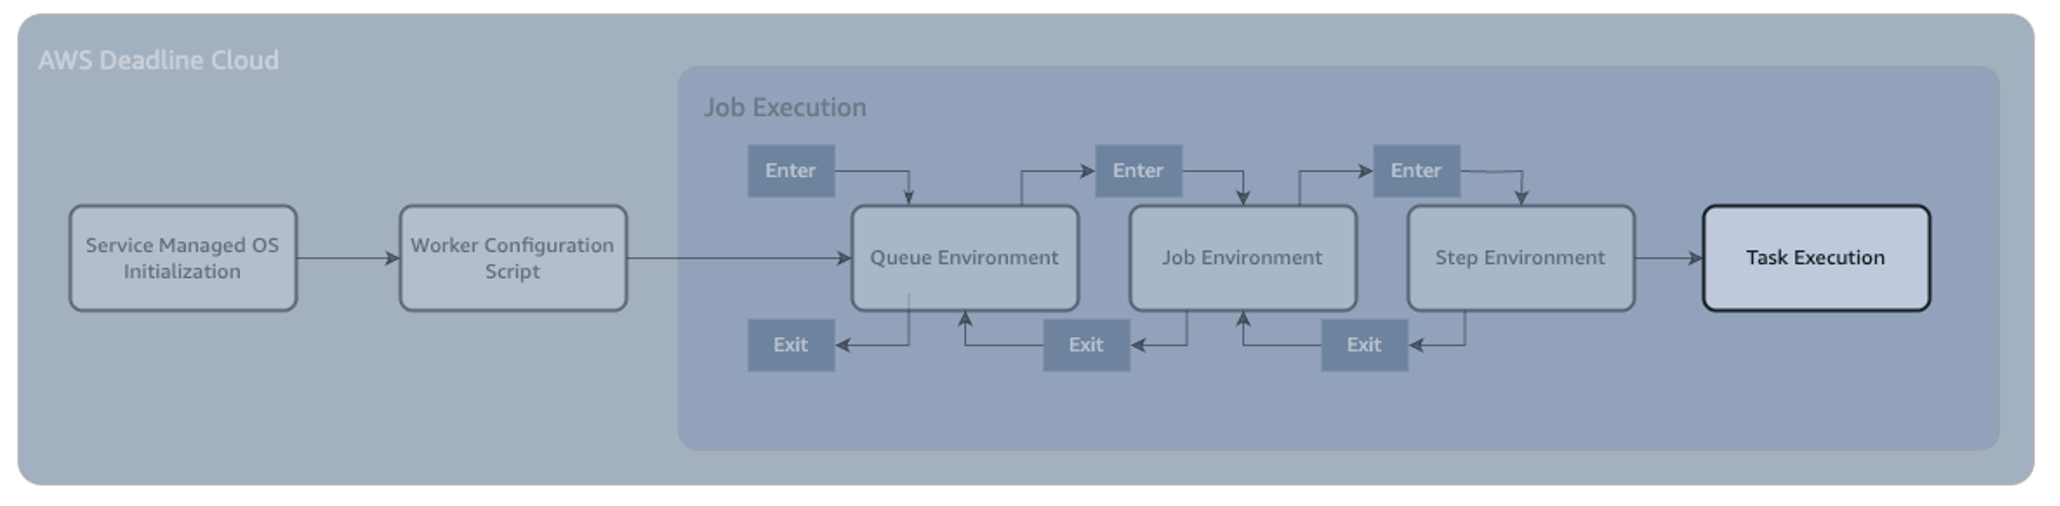
In this example, we will use the job execution flow to:
In order to do this, we will use these 4 touchpoints in the render lifecycle:
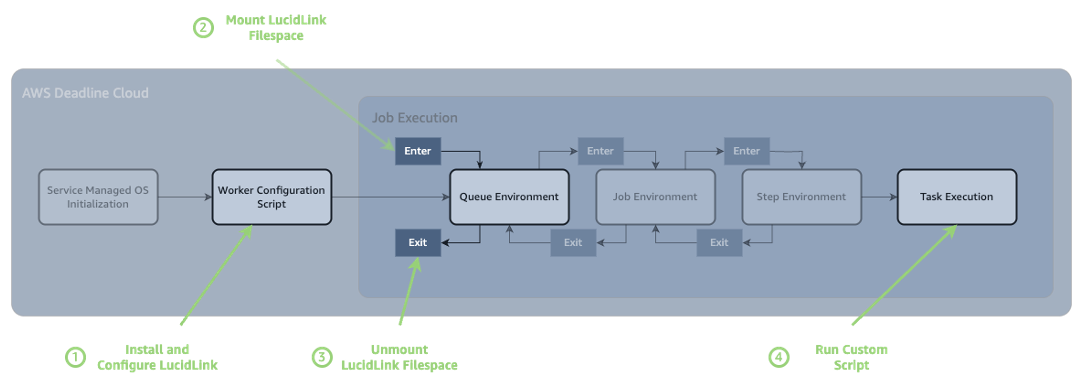
By the end of this tutorial, you’ll have:
Securely store your LucidLink credentials using AWS Secrets Manager. These credentials will be retrieved by your rendering jobs to mount the LucidLink filesystem:
{ "username": "your-lucidlink-username", "password": "your-lucidlink-password" }
Create your Deadline Cloud farm that will host your rendering workloads:
Create a configuration script that installs the LucidLink client on your fleet instances. This script focuses only on installation and daemon setup. It is important to test this script on a standalone EC2 instance first to confirm it works in your environment before deploying to your fleet.
Now create your fleet with the LucidLink configuration script:
This will create a job queue that users can submit render jobs to and will leverage the render fleet we created earlier.
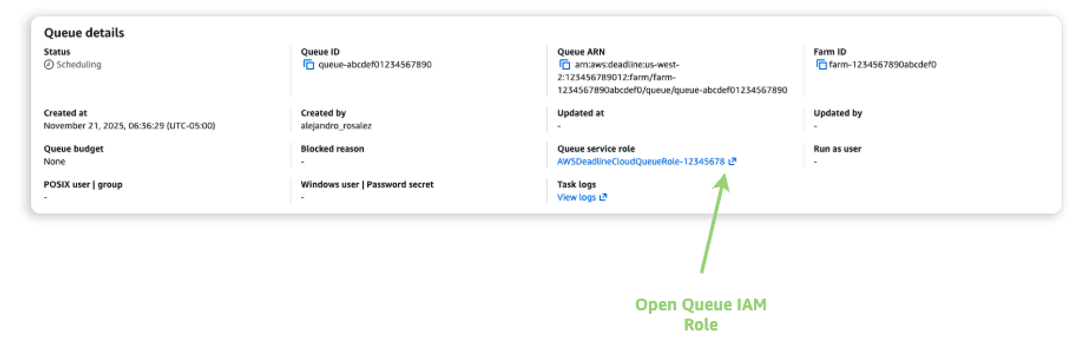
Find the IAM role that the Queue is using, and add permission to access the secret in Secrets Manager:
We can use Queue Environments to run custom scripts directly in Deadline Cloud, whenever a job starts on a specific queue. In this example we will run Bash scripts at two points during the job execution:
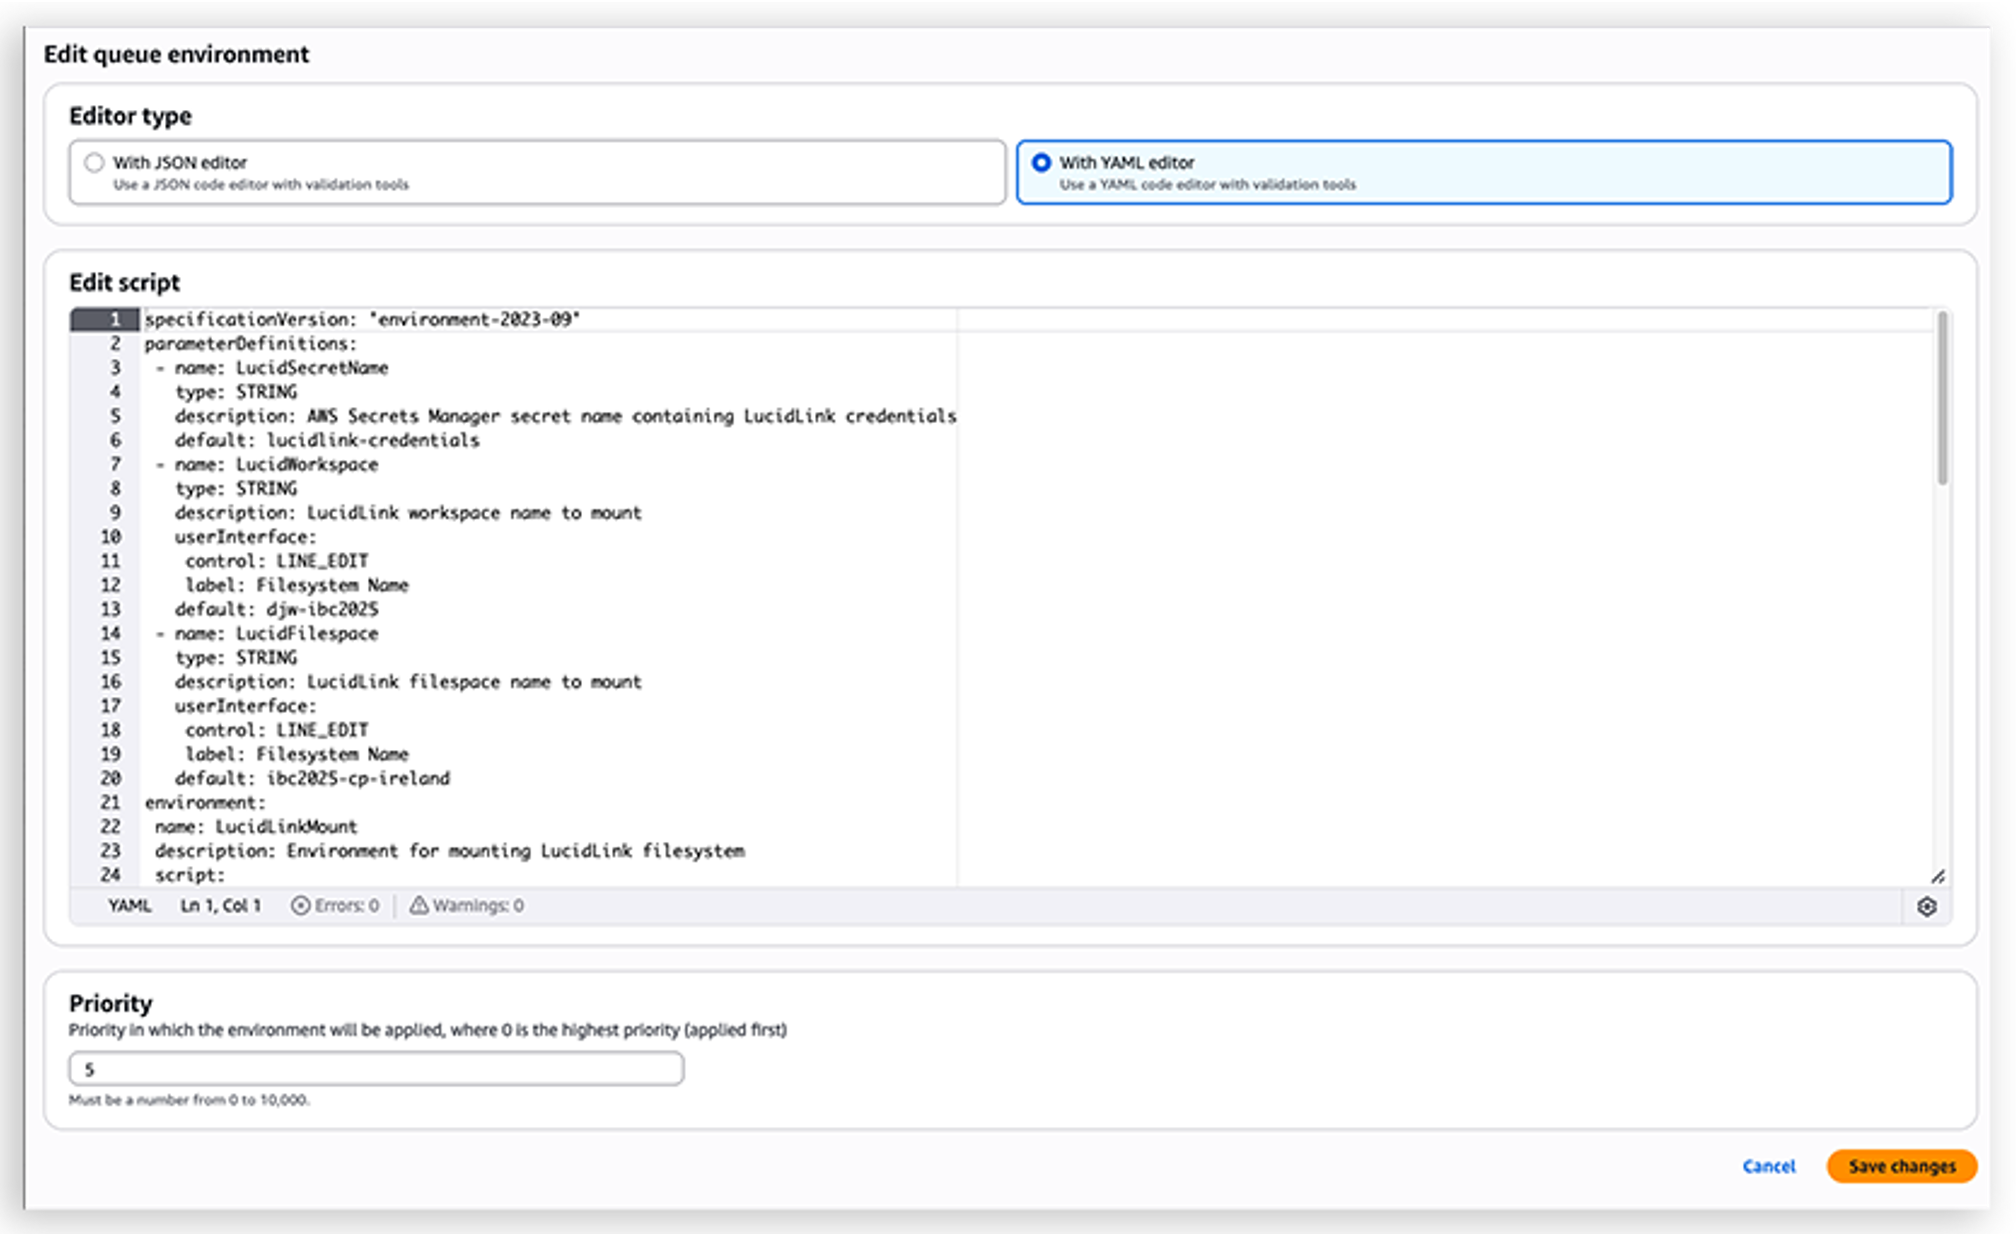
In the Queue Environment, we can expose parameters to the user through parameterDefinitions. In this case, we're allowing the user to change the following settings, and also setting defaults:
In Open Job Description YAML, this is what that looks like:
If we put this together into a single Open Job Description environment, we can add it for use in our Deadline Queue.
In order for this to be loaded in AWS Deadline Cloud, select the desired queue, and navigate to the 'Queue Environments' tab:

Select Actions, Create New from YAML, and paste in the queue environment script.
To validate your LucidLink integration, create and submit a test job using the AWS Deadline Cloud CLI.
Install the Deadline Cloud CLI First, install the Deadline Cloud CLI tools: pip install ‘deadline[gui]’
Install the Deadline Cloud Monitor The Deadline Cloud Monitor is required for job authentication and monitoring. Download and install it from the AWS Deadline Cloud console:
Create a test job template Create a basic OpenJD job template to verify your LucidLink filesystem is properly mounted and accessible. Save the following content as template.yaml in a new directory:
Submit and monitor the test job.
Submit your test job using one of the following methods:
Verify the integration Once the job is completed, verify that your LucidLink filesystem was successfully mounted:
A successful test will show the complete directory hierarchy of your LucidLink filespace, confirming that the filesystem was properly mounted and is accessible during the job execution.
This modular architecture separates installation from mounting, allowing different jobs to use different filesystem configurations. The LucidLink daemon runs as a systemd service for persistence across job executions, while mount points require chmod 755 permissions and the --fuse-allow-other flag for access. Credentials are securely retrieved from AWS Secrets Manager, and the OpenJD template automatically handles mounting and unmounting for clean resource management. Always test your configuration script on a standalone EC2 instance before deploying to your fleet.
If you encounter issues during setup or job execution, start by checking the fleet configuration script logs in the AWS Deadline Cloud console to verify the LucidLink client installed correctly. For mounting problems, right-click on a failed task and select ‘View Worker Logs’ to confirm the daemon is running, and review job-specific logs for any filesystem access errors. Permission issues typically indicate that either the fleet's IAM role lacks access to your Secrets Manager secret or the mount point permissions need adjustment. Template-related problems can be identified by validating your OpenJD YAML syntax and testing job templates with the Deadline Cloud CLI before submitting production workloads.
If you decide to discontinue using Deadline Cloud with LucidLink, In the AWS Deadline Cloud console, delete your fleet and queue. If you created a test EC2 instance, terminate it from the EC2 console. Optionally, delete the AWS Secrets Manager secret containing your LucidLink credentials if it's no longer needed.
By separating LucidLink installation from filesystem mounting, you achieve a more flexible and maintainable setup. The service-managed fleet handles the one-time client installation, while OpenJD job templates manage filesystem mounting per job, providing:
This architecture provides high-performance shared storage for your rendering workflows, while maintaining security best practices and streamlining operations. The combination of the global file system of LucidLink and the scalable rendering infrastructure of AWS Deadline Cloud provides creative teams a way to collaborate seamlessly across geographic boundaries.
Contact an AWS Representative to know how we can help accelerate your business.
For more information about AWS Deadline Cloud service-managed fleets and configuration scripts, visit the AWS Deadline Cloud documentation. To learn more about Open Job Description (Open JD), visit the OpenJD specifications GitHub page, or the OpenJD documentation page.
LucidLink is a storage collaboration platform that frees creative teams to work together from anywhere. With a single shared filespace protected by zero-knowledge encryption, your team can instantly and securely access, edit and share projects of any size. Learn more about LucidLink on AWS.